


Forgot Password?
Please enter your email address to receive a link for resetting your password.
Thank You
You will receive an email with further instructions. Please contact customer support if you need any further assistance.
Please verify your email address
A verification link has been sent to your email to activate your account. The link will be valid for 1 hour.
Please check the spam inbox if you can't find the email. If you still can't find it, we can resend it.
A verification link has been sent to your email 00:00

Behind the Lens: Charles Chessler’s Photo Walk Experience with Printique & Adorama
 Facebook
 Twitter
 LinkedIn
 Email
Email
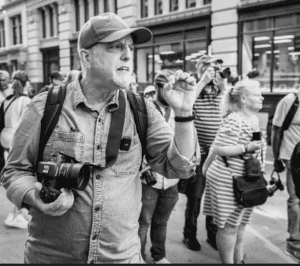
*Image by Jennifer Mullowney*
I had a great time leading a photo walk to Union Square on July 9th for Printique and Adorama.
It was HOT out, but we had a full house of intrepid photographers who were a joy to interact with.
We started at the Adorama Event Space and went over some basics before heading out. We then made our way to Union Square where we worked with natural light and a reflector, and we finished the afternoon with a demo of balancing added light with natural light.
The afternoon was sponsored by Westcott and SanDisk, and one lucky attendee won a 1TB memory card from SanDisk in a raffle.
I’m a Westcott guy, so the reflector we used was a very portable 32″ Silver/White reflector from them.
For the added light demo at the end, I used the tiny, but mighty, Westcott FJ200 with a shoot-through umbrella mounted on the Pro Grip 2, which I handheld in my left hand.
The FJ200 was triggered by the FJ-X3m wireless trigger mounted on my camera’s hot shoe.
I shoot with a Canon R5 and I used the very capable Canon RF 50mm f/1.8.
The beauty of that lens is that it is light enough for me to one-hand the camera while holding the strobe in my other hand.
I am fortunate enough to have an EF 50mm f/1.2, which I use with an EF-RF converter, but I can’t handhold that lens in one hand and operate my camera due to its size and weight.
The Walk:
When we got to Union Square, the light was contrasty in one direction and not contrasty in the other direction.
We started in the contrasty direction and addressed Dynamic Range and how the camera can only capture a certain amount while the human eye can see a much wider range.
What is Dynamic Range and why is it important?
“Dynamic Range” is the range of tones from the darkest dark to the brightest bright and is represented by the histogram that you see on your camera and in image processing software.
It’s important because our human eye can see a very wide range of tones, but our cameras can only capture a part of that range.
If an image is very contrasty (extremes of dark tones and bright tones), the camera, if left on Auto, will try to balance everything out to a Middle Gray, or 18% Gray.
The camera does not necessarily know what your subject is, and we need to “Expose for our Subject.”
An example to clarify:
Have you ever taken a photo of the snow which came out gray?
That’s because your camera’s sensor is seeing all the brightness of the snow (the right side of your histogram) and assuming that your image is overexposed.
Left on Auto, your camera will move all of the brightness to the Middle Gray of the Dynamic Range, “correcting” it for you, and you end up with gray snow.
The camera does not know that the SNOW is your subject and that your histogram should be skewed all the way to the right.
So we need to be smarter than that camera and use either Exposure Compensation or a manual adjustment to get the really correct exposure according to our subject.
Thus: “Exposing for Your Subject.”
This will be clear in the first example photos from our photo walk:
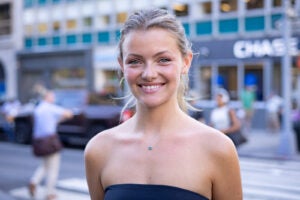
In these images, we started by having Amelia stand in Open Shade, but the background was extremely bright from the direct sun. So, “Contrasty Light.”

The first image shows a proper exposure based on the bright background, but Amelia, as you can see, is deep in shadow.
In the second image, we “exposed for our subject” and had to completely overexpose the background in order to get a decent exposure on Amelia.

In the third image, we added a reflector just under the frame to fill in some shadows and get some catchlights in Amelia’s eyes.
While not necessarily an ideal image, it was the best we could do in that light and shooting in that direction without adding light.
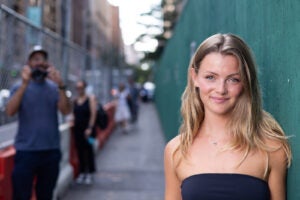
Next, we turned around, and things changed dramatically because there was no longer a bright, bright background to contend with. In that direction, everything was in Open Shade, and the Dynamic Range was more contained, making for an (I think) more pleasing image.
The first image in that direction was shot without a reflector, and you can see the shadows in Amelia’s face.
The second image added a reflector just below the frame and filled in the shadows and gave us some catchlights in her eyes.
A note about settings:
With natural light, I like to work in Aperture Priority Mode.
With that mode, I also use Auto ISO coupled with a Minimum Shutter Speed (MSS).
Working this way allows me to:
Set up my shot.
Choose my Aperture.
Make sure my focus is where I want it.
Shoot.
The only adjustment I need to make, if necessary, is to brighten or darken my image by dialing in some Exposure Compensation.
Because I use Auto ISO coupled with an MSS, the camera will raise the ISO (if necessary) to brighten my image while maintaining the minimum shutter speed that I need to get a sharp image. If I need to darken my image, the camera will simply increase the Shutter Speed, which is not an issue for getting a sharp image. And, all this time, I’m getting the Depth of Field I desire because my Aperture is locked in.
Settings: The Added Light Demo:
When working with added light, I’m always in “Manual” for my camera settings. This allows me to lock in the relative brightness I want for the background before adding light for my subject.
The beauty of adding light is that you essentially get 2 exposures – the ambient/background (camera settings) exposure and the subject (lit by your flash/strobe) exposure. You’ve also, essentially, increased your Dynamic Range.
My camera settings for the light we were in were: f/2.5, ISO 100, and 1/500th shutter speed.
How did I arrive at these settings?
I started with the Aperture because I wanted to control Depth of Field.
Because there was a decent amount of light, I chose ISO 100.
I then dialed in my shutter speed to get the exposure I wanted.
In this case, the shutter speed was 1/500th, which is above the Maximum Sync Speed of my camera.
I usually go with Manual for my flash settings, but I used TTL (auto), and it was spot on.
About High Speed Sync (HSS) and Maximum Sync Speed:
Maximum Sync Speed when using a flash or a strobe is the maximum shutter speed you can set and still have the strobe light the entire scene.
Why is that?
When you depress the shutter button, there are two curtains which drop in succession, exposing your sensor to the scene and to the light.
If your shutter speed is, say, 1/500th of a second, the first curtain drops, and after 1/500th of a second, the second curtain drops, exposing the shutter to said scene and light for that 1/500th of a second.
The same is true whether your shutter speed is 30 seconds (please use a tripod!), 1 second, 1/30th of a second, or 1/2000th of a second.
WHEN USING A STROBE, a camera’s Maximum Sync Speed is the fastest shutter speed at which the entire scene will be lit by the flash/strobe. Anything faster, and the second curtain will drop before the entire scene is lit by the strobe, and you will get a dark line across your image.
My Canon R5’s Maximum Sync Speed is 1/250th of a second. This means that I can set my shutter speed at 1/250th, and the flash/strobe will light the entire scene before the second curtain drops. Anything faster, and I have to use High Speed Sync.
High Speed Sync is a great tool because it allows you to use faster shutter speeds to darken the ambient (existing) light if you wish. A couple of tradeoffs are that it uses more power, depleting your battery more quickly, and the recycle times are slower.
How Does High Speed Sync Work:
Instead of emitting one “pop” of flash, the flash pulses as the curtains are dropping. If your shutter speed is 1/4000th, for example, the flash/strobe will be pulsing A LOT. (Ergo, the power usage and increased recycle time.)
For the light we were in at the end of the photo walk, I was at that shutter speed of 1/500th, so the recycle times were still pretty respectable, and the battery (especially the excellent battery life of the FJ200) would not have been an issue if I had been doing a “normal” (for me) shoot for a client and working for about 90 minutes. That being said, I always bring a second battery with me, just in case.
Cheers,
— Charles Chessler
*Featured Black and White image shot by Jennifer Mullowney