


Forgot Password?
Please enter your email address to receive a link for resetting your password.
Thank You
You will receive an email with further instructions. Please contact customer support if you need any further assistance.
Please verify your email address
A verification link has been sent to your email to activate your account. The link will be valid for 1 hour.
Please check the spam inbox if you can't find the email. If you still can't find it, we can resend it.
A verification link has been sent to your email 00:00

 Facebook
 Twitter
 LinkedIn
 Email
Email
Ever fancy yourself as a background designer for photography? It’s a great way to make yourself stand out from the crowd by using your own imagery and controlling the final artistic photographic image. We sit down with Printique Ambassador, Terry Geerdts of A Pretty Pixel who gives us 6 tips on making your own photo backgrounds.
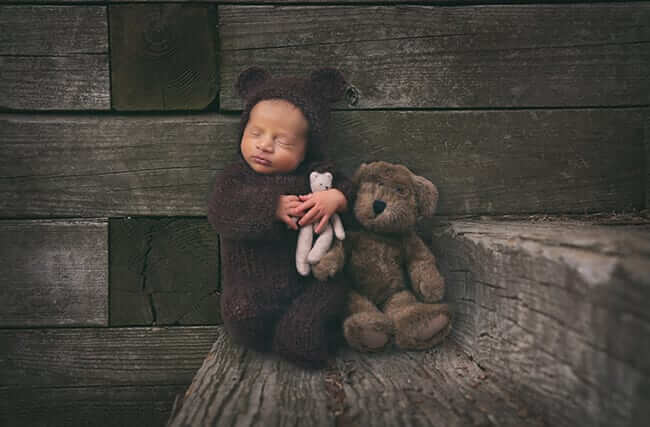
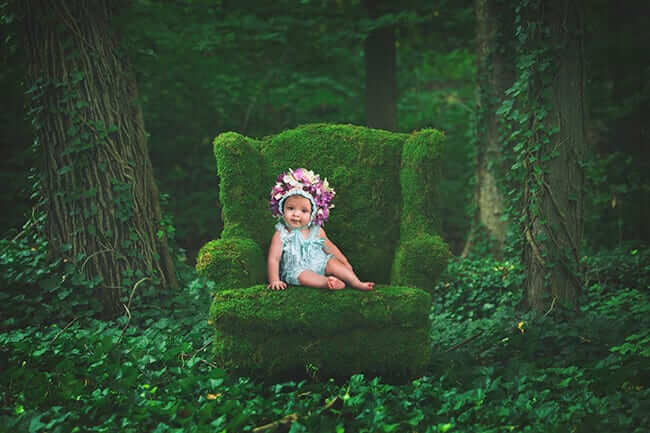
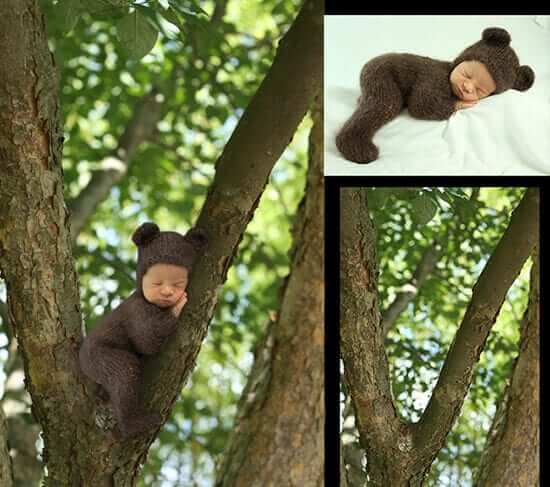
Using your own backgrounds in composites, I decided to do a series of images called “newborns in nature”. Since I don’t usually photograph newborns outdoors( for safety reasons), I decided to take my own digital backgrounds and then composite my newborn images into the scenes. Inspired mostly by Anne Geddes, who did many newborns in outfits and props with nature themes and several other photographers doing similar work, I decided to go out finding interesting backgrounds to use. I went around looking at each scene and then had to decide if it would work with a newborn or baby in it. I also took flower and leaf macro images for some fun shots too.
1.Lighting
Photographing your background images can be quite a challenge and lighting is one of the most important components to it. It’s best to go out when it is cloudy out as even lighting is much easier to use when compositing your subject into the background. If you have a distinct direction of light, then your subject must be photographed with that same lighting pattern and direction for consistency.

2.Perspective
Perspective is another important factor when photographing the backgrounds. If you are photographing the backgrounds before your subject is being photographed then you need to be aware of the height and angle you are photographing them at to then match that with how you photograph your subject. If photographing a scene down at a low angle your subject must be photographed at that same angle to make it match and look believable.
3. Props
Bring props to the scenes. I brought baby beds and baskets and such to my outdoor scenes for more of a variety. I took a chair and covered it with moss for a great prop and brought it to different locations. Chairs can work well for composites of all ages. You just need to have a similar chair in the studio to photograph your subject in for compositing.

4. Position
You must figure out what props will work as you need to be able to position your subject after in studio so that they look like they were on that prop. That part takes some practice. It’s best to photograph your subjects on a solid background that is in a similar color to the scene you will be compositing them in to. I generally use white, gray, green or a beige depending on what the subject is wearing and what background I will be adding them to.
5. Digital Work
You need to have some knowledge of masking and layers to be able to composite. Cutting out your subject for your composite can be done in several ways. You can do it directly in Photoshop by using the refine mask feature. Now with the newest update in PS it has changed a bit and is now called select and mask. There are also other programs that do the same thing. One is called Topaz Remask and one is called Fluid Mask by Vertus Tech. I use Photoshop select and mask most of the time. The cut out must be precise to be believable. Hair is usually the toughest part of a cutout.
6. Shadows
Shadows are tricky. You might want to photograph a test subject when photographing your digital background at around the same spot you plan on compositing your subject in so you can see lighting and shadows. You will need to recreate realistic shadows to make the composition believable. Shadows can be created in several ways in Photoshop. You can have levels adjustment layers or a curves layer, and I’m sure there are many other ways as well. It does take a while to get believable looking shadows, and I suggest you look at your hand or foot when you place it on something to start to understand how shadows should look. Depending on the lighting in your digital backdrop you need to try to follow the lighting direction with your shadows. This step in compositing is the crucial step in making it believable.
Thank you Terry for your insight! If you would like to see more of the backgrounds Terry made, you can go HERE.