0
Three Tips for Better Composition
By John O’Connell
Cameras can do amazing things all by themselves. Set the exposure-mode dial on your DSLR, mirrorless or compact digital camera to the green Auto or “P” icon, aim at something, slowly press the shutter release, and you’ll most likely get a properly exposed, focused picture. But it may not be a good image.
What commonly separates interesting, effective images from boring or “blah” ones? Composition. Here are three tips to better-composed photos.
 1. Fill the frame
See that little spec of yellow on the far side of Rome’s Coliseum? That’s your wife in her favorite shirt and hat. Or see that cute couple sitting at a table in an enormous banquet room? They’re the friends you came to the wedding reception with.
The simple reason we want to pay attention to composition is that our goal must be to help the viewer clearly know what you wanted to show them. One of the ways you can do this is to get closer (with your feet or your zoom lens) and fill the frame. In one of the examples above, decide what you want the picture to show… your wife or the Coliseum?
If you want to create a beautiful portrait of your wife, one method is to make her the closest element in the frame. Compose so she’s prominent in the frame, maybe off to the left or right a bit. Let her fill at least a third of the frame, with a wall of the Coliseum way behind her. Use a wide aperture (f/5.6, f/4 or wider) to soften the background, focus on her eyes, recompose to place her where you want her in the frame, and snap the shutter.

But “Wait!” you say; you want to show your wife in the Coliseum!
Ok, then how about putting your wife up in front of the lens from the waist up, off to one side, and use the Roman ruin as the background? Remember to use an aperture of f/16 (deep depth of field), so your wife and the background will both be in focus.
As for the couple at the reception in the other example above, as a newspaper editor who gets hundreds of submitted photos, it’s amazing how many pictures I get of ballroom ceilings and empty dance floors with a few people almost hidden away in a tiny corner of the image. Learn to either walk right up to the people you want to photograph, use your zoom lens, or crop the image in post-capture editing; just remember that unless it’s the Sistine Chapel, no one wants ceiling pictures.
2.Color separation
In the Coliseum example above, the yellow hat is something to keep in mind as well. Color, or rather the difference or contrast between your main subject’s color and the hues and colors of the rest of the image can be used to emphasize your subject. A bright, vivid color will capture our attention more if there are no other vivid colors in the frame.

And that’s true more basically. The brighter part of the picture will attract a viewer’s eyes more than a dark area, especially if most of the photo is dark and one is light. Keep that in mind when you take a group portrait, and you see a bright light on the wall in the background; the light will distract. And watch for red EXIT signs behind “table shots” at parties: the intentionally vivid red color will draw the viewer’s eyes away from the people you focused on.
So watch the light: On a sunny day, make sure your subject isn’t in the shade, and the rest of the scene is in bright sun. Try to have your main subject the brightest element, or at least not “outshined” or figuratively eclipsed by the rest of the picture. If you can’t move your subject or camera to fix such a situation, use your pop-up flash to shine some “fill flash” on your main subject.
3. Tic, Tac, Toe
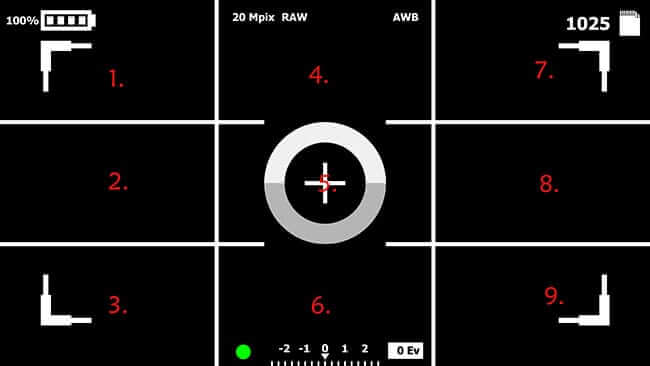
Great painters have long known an axiom about the “best” location for the main subject: Imagine the rectangular photo area, bounded by four borders, transected by two equidistant vertical and two equidistant horizontal lines, like a Tic, Tac, Toe game. The lines intersect in four places and divide the whole frame into nine equally sized boxes. Artists know that our eyes are drawn to those intersections and that when the subject is located on one of those intersections, the whole image becomes more balanced and more dynamic.
Some camera viewfinders can be set to show these lines to assist in composition.
Photographers use this Rule of Thirds as well. Personally, I assign numbers to each of the nine boxes: starting at the top left and going down, the left-side boxes are numbered 1, 2 and 3. The middle vertical column is 4, 5 and 6, and the right-most column of boxes is 7, 8 and 9.
An example: Say you have a track star running from left to right along the horizontal frame of your viewfinder (running from box 2 to 5 to 8). Where do you want the athlete’s head and body? At the end or right side of the frame (box 8)? In the center (box 5)? I’d say you want the main subject at the top left intersection point, so she’s running into the photo, not on the way out. So you’d place her at the four-corner point made by boxes 1-2-4-5.
The box-number system works for me but disregard if it makes things too complicated. Just remember to situate the most important part of your picture in one of the intersections and you’ll find yourself creating more interesting images.
Another example: You want to take a chest-up portrait of a co-worker. The office environment will be the background. If you place your subject in the center and fill two-thirds of the frame with him (following the fill-the-frame rule), I think the eye will naturally try to look behind him to see what the office looks like. The viewer will be distracted, not by what’s there, but by what’s hidden. So I’d place your subject on one of the vertical lines so that he’s prominent in a more balanced image. (The same portrait with a plain, uncluttered background may permit a centered subject better because you’re not “hiding” competing compositional elements.
There are more composition “rules.” I’ll blog about them soon.
Remember, though, many great images, especially portraits, violate the rules. Some famous portrait photographers are known for their centered faces. So learn the rules well, then break them if doing so makes a better picture!
You can check out my other 101 posts here:
Aperture Exposure
Shutter Speeds
Right ISO
Focal Lengths
 Facebook
 Twitter
 LinkedIn
 Email
Email